Source:https://easiklip.com
You are down to the absolute final stretch of a gorgeous restoration project. The old, scratched mahogany coffee table has been stripped, sanded, and prepped. Then, you spot it: a deep, ugly gouge right in the center of the tabletop where a rogue screw dug into the wood grain. If you ignore it, your final stain coat will pool inside the crater, turning it into an permanent, dark eyesore.
In my 10+ years of getting my hands dirty in the home improvement industry, I have seen this exact scenario freeze DIYers and intermediate woodworkers right in their tracks.
Many people assume that fixing deep blemishes requires complex, two-part epoxy compounds and professional-grade chemical masks. But for the vast majority of everyday home gouges, nail holes, and grain splits, the secret weapon in my toolbox is a reliable wood filler tube.
When deployed with the right technique, this humble squeeze tube can render structural blemishes completely invisible to the naked eye. Let’s pull back the curtain on the actual science and practical mechanics behind flawless surface restoration.
The Chemistry Behind the Compound: Solvent vs. Water-Based Fillers
Before squeezing any product onto your hard-earned wood surfaces, you must understand exactly what is inside that packaging. Not all compounds are created equal, and grabbing the wrong formula can completely ruin your finishing coat.
1. Water-Based Formulations (The Clean Finish)
Water-based compounds typically utilize wood flour, binders, and pigments suspended in water. They are the go-to choice for indoor furniture, baseboards, and cabinetry because they have almost zero odor and clean up seamlessly with a damp microfiber cloth.
-
Pros: Easy to sand, accepts stains beautifully, and can be thinned down with a few drops of warm water if it starts to dry out.
-
Cons: Not suitable for heavy outdoor exposure unless completely sealed with a high-grade polyurethane topcoat.
2. Solvent-Based Formulations (The Heavy Lifters)
Solvent-based fillers rely on wood fibers mixed with acetone or other chemical solvents. They smell strong, dry exceptionally fast, and cure to a rock-hard consistency that shrugs off weather and moisture.
-
Pros: Highly resistant to rot and water; perfect for exterior window sills, deck boards, and structural trim.
-
Cons: Requires mineral spirits or acetone for cleanup, and they can easily strip pre-existing finishes if smeared carelessly.
Why the Wood Filler Tube Wins for Precision Execution
For years, manufacturers sold filler almost exclusively in wide-mouth plastic tubs. If you are a pro filling hundreds of open grain pores across an entire dining table, a tub makes sense. But for target repairs, the tub format is an efficiency killer.
The moment you open a plastic tub, a massive volume of air rushes inside. Within weeks, the top layer forms a hard, unusable crust, forcing you to waste half the product.
An enclosed wood filler tube, however, acts like an airtight vault. It keeps the volatile elements of the compound perfectly preserved. The narrow nozzle allows you to inject the material directly into the base of a deep nail hole or split wood grain without smearing excess product over the surrounding pristine timber.
Think of it like using a syringe for medical precision versus using a trowel to slap mortar onto a brick wall.
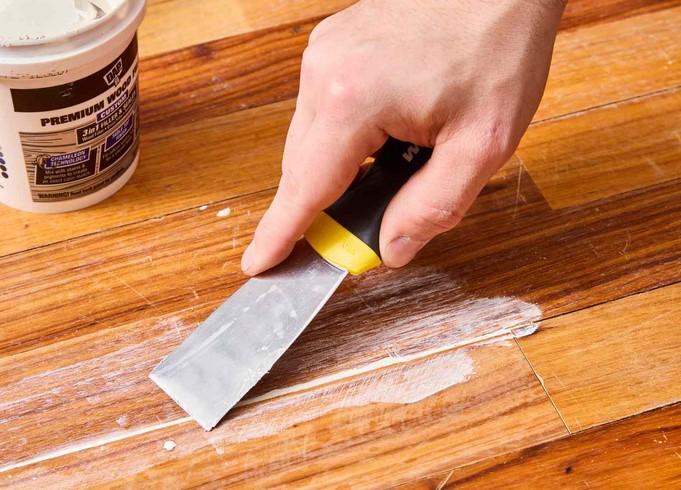
The Step-by-Step Anatomy of a Flawless Surface Repair
Achieving a seamless repair requires a precise sequence. If you skip a step, the filler will eventually pull away from the wood walls, leaving a loose plug that pops out during temperature shifts.
💡 Pro Tip: The Sawdust Blend Trick
If you are working on a piece of raw timber that you plan to coat with a clear stain, collect a small pile of the fine sawdust generated during your prep sanding. Mix a few pinches of that exact dust directly into your water-based filler before squeezing it onto the spot. This infuses the repair patch with the authentic cell structure and color profile of the host timber, drastically improving stain uniformity.
Steering Clear of the “Shine Patch” Disaster
Even experienced woodworkers can stumble during the final clear-coating phase. Here are the two hidden warnings that keep me up at night on high-stakes restoration jobs.
-
The Non-Stainable Lie: Many product labels proudly declare they are “100% stainable.” The technical reality is that wood filler absorbs stain at a completely different rate than organic wood cells. It lacks natural grain pathways, meaning it can easily look lighter or darker than the rest of the surface. Always test your wood filler tube and stain combination on an inconspicuous test scrap before committing to the main face of your project.
-
The Flash Cracking Hazard: If you try to fill a hole deeper than 1/4 inch in a single pass, the outer shell will dry faster than the core. The trapped moisture below will try to escape, causing the surface to blister, crack, and break away. For deep voids, apply the compound in thin, sequential layers, allowing each layer to cure completely before injecting the next.
Conclusion: Master Your Finishing Details
At the end of the day, high-impact home improvement isn’t about avoiding mistakes—it’s about knowing how to fix them with absolute precision. By selecting the correct chemical formulation, utilizing the airtight delivery of a wood filler tube, and sanding with the grain, you can transform an accidental blunder into a totally invisible triumph.
Your furniture and woodwork deserve to look flawless, from the broad grain down to the smallest nail hole.
What kind of surface damage are you trying to repair right now? Are you working on a stained antique or painting over rough exterior trim? Leave a comment below with your project details, and let’s get your woodwork looking seamless together!