Source:https://image.made-in-china.com
It’s 7:00 AM on a manic Monday. You are trying to kickstart a healthier routine, so you jam three whole carrots and an apple into your new appliance. Instead of a smooth, vibrant elixir, the motor groans like a dying lawnmower, the kitchen counter starts vibrating violently, and you are left with a glass of warm, separated foam and a basket full of soaking-wet pulp.
Over my 10 years consulting on residential kitchen design and high-efficiency home appliances, I have witnessed this exact scenario play out in countless households.
People invest in wellness gear expecting a seamless lifestyle upgrade, only to relegate their expensive hardware to the dark corners of the pantry within two weeks.
The missing link isn’t your willpower; it’s an understanding of operational wellness integration. Your kitchen is an ecosystem. To yield high-performance nutritional output, you have to treat your appliance selection and maintenance with the same engineering mindset you would apply to a home HVAC system or a high-end power tool.
When you properly integrate a commercial-grade juicer extractor machine into your home workflow, it ceases to be a clunky appliance and becomes a streamlined asset for your daily health routine. Let’s look past the marketing buzzwords and break down the hard technical realities of maximizing liquid extraction.
Centrifugal vs. Masticating: Decoding the Extraction Engine
The biggest roadblock for beginners and intermediates is selecting the wrong extraction mechanics for their lifestyle. All appliances in this category are not built the same.
1. Centrifugal Extractors: The High-Speed Muscle
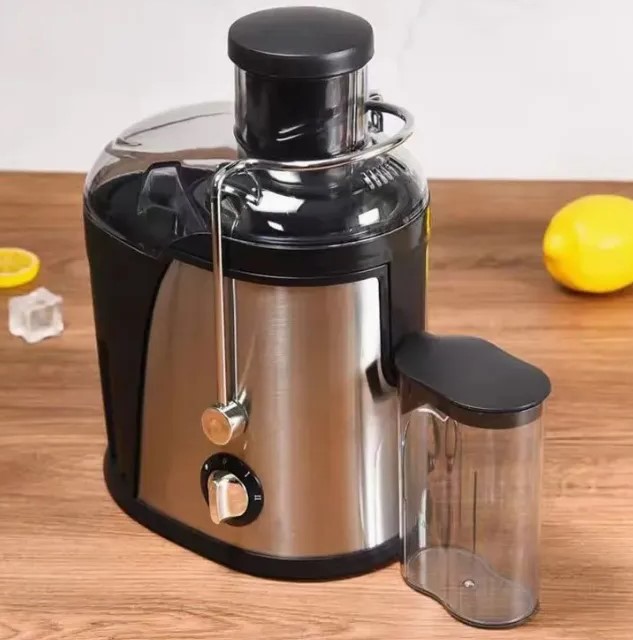
Think of a centrifugal juicer extractor machine like a high-speed washing machine on the spin cycle. It utilizes a flat, fast-spinning mesh basket lined with tiny razor-sharp teeth that shreds produce at blistering speeds—typically between 6,000 to 14,000 RPM (Rotations Per Minute).
-
Pros: Incredibly fast processing speeds; wide feed chutes mean less prep time cutting fruits.
-
Cons: The high-speed friction generates heat and introduces significant oxygen into the liquid. This accelerates oxidation, causing the juice to separate and degrade nutritionally within hours.
2. Masticating Extractors: The Slow Cold-Press
If a centrifugal unit is a sports car, a masticating unit is a heavy-duty tractor. It uses a slowly revolving screw-like mechanism, known as an auger, to crush and chew through produce at a steady 40 to 80 RPM.
-
Pros: Minimal heat transfer and zero oxidation. This preserves live enzymes and allows you to store the extracted juice for up to 72 hours. It also handles fibrous leafy greens like kale and wheatgrass with ease.
-
Cons: Higher upfront cost and requires you to chop your produce into smaller pieces beforehand to avoid jamming the auger.
Technical Metrics: Finding Your Kitchen’s Sweet Spot
To achieve a seamless home integration, you must look at the technical specifications under the hood. Marketing labels love to brag about “peak wattage,” but that is often a vanity metric.
Torque vs. Wattage
A high wattage rating (e.g., 1000 watts) on a centrifugal unit simply means it consumes a lot of electricity to spin that basket fast.
On a slow masticating juicer extractor machine, you want to look at the torque and gear reduction system. A lower wattage motor (around 150 to 200 watts) with a high-torque gear system will easily crush dense sweet potatoes without stalling out or overheating.
Pulp Yield Optimization
The ultimate test of any appliance is the moisture content of the discarded pulp. If you can squeeze the pulp with your hand and drops of liquid fall out, your machine is operating inefficiently.
High-performance models feature adjustable pressure caps on the pulp discharge chute, allowing you to restrict the exit flow slightly to squeeze out every single micro-drop of micronutrient-rich liquid.
Designing the Ultimate Countertop Workflow
In my design practice, I always tell clients: “Out of sight, out of mind.” If your extraction unit weighs 20 pounds and sits inside a deep bottom cabinet, you will never use it.
The Dedicated Wellness Zone
To naturally drive daily usage, designate a permanent footprint on your kitchen counter close to the sink.
-
Proximity to Plumbing: Cleaning up instantly is the secret to long-term operational success. Having your machine situated right next to the sink basin cuts down your processing pipeline significantly.
-
The Gravity Feed Advantage: Ensure there is enough vertical clearance between your upper cabinets and the countertop to easily operate the pusher rod without hitting the wood trim above.
The Pre-Chilled Thermal Shield
To combat the enzymatic degradation caused by frictional heat in budget centrifugal models, store your dense produce (apples, celery, carrots) in the coldest part of your refrigerator overnight. Processing ice-cold produce lowers the ambient temperature inside the cutting basket, preserving vulnerable vitamins and extending the shelf life of your drink.
Hidden Warnings: The Structural Killers of Kitchen Hardware
Over a decade of inspecting returned and broken appliances, I’ve found that consumer negligence usually boils down to two critical operational errors.
-
The Micro-Mesh Calcification: The stainless steel micro-mesh screen is the lung of your juicer extractor machine. If you let the pulp dry out for even an hour after extraction, the natural sugars and fibers dry into an invisible, concrete-like glaze that chokes the micro-pores. Always scrub the screen with a stiff-bristled nylon brush immediately under running water.
-
The Celery Fiber Wrap: Long, fibrous stalks like celery or parsley act like ropes inside a masticating auger. They can wrap tightly around the drive shaft, creating massive friction that can crack the plastic housing or burn out the motor clutch. Always chop fibrous stalks into half-inch segments before feeding them into the chute.
Conclusion: Fuel Your Daily Efficiency
Integrating high-performance wellness into your busy household shouldn’t feel like an uphill battle against a stubborn kitchen appliance. By matching your nutritional goals with the correct extraction mechanics—whether that’s a rapid-fire centrifugal unit or a nutrient-dense slow masticating auger—and engineering a permanent, high-efficiency countertop workspace, you transform a chore into an effortless habit.
Your kitchen hardware should work just as hard as you do to maintain your physical baseline.
Are you looking to upgrade your current kitchen workflow, or are you torn between a high-speed and a slow cold-press model for your family? Leave a comment below detailing your typical morning timeline, and let’s architect the perfect appliance strategy for your home!