Source:https://mobileimages.lowes.com
When it comes to interior design, every detail counts. Often, we focus on the larger elements like furniture, wall color, and flooring, but small touches can have an equally significant impact on the overall aesthetic of a room. One such element that can transform the look and feel of a space is decorative door hardware for a finishing touch. Whether it’s a stylish knob, a vintage handle, or an elegant hinge, the right door hardware can serve as the perfect complement to your door and elevate the entire room’s design. In this article, we will explore the various types of decorative door hardware, the impact it can have on your home’s style, and how to choose the perfect pieces to add a sophisticated touch to your doors.
1. The Role of Decorative Door Hardware in Interior Design
Decorative door hardware plays a much larger role than simply allowing you to open and close doors. These small yet important accessories provide an opportunity to add personality, functionality, and style to a space. From entry doors to interior doors, the hardware you choose can set the tone for a room and influence the overall atmosphere of your home.
Subheading: Functional and Aesthetic Benefits of Door Hardware
- Enhancing Aesthetic Appeal: Decorative door hardware can serve as a focal point within a room, adding an element of design that might otherwise be overlooked. A beautiful door handle or an antique knob can introduce texture, color, and visual interest. Whether you are aiming for a modern, rustic, or traditional style, there are countless designs available to suit your taste. For example, a sleek, minimalistic handle may be perfect for contemporary spaces, while an intricate vintage doorknob could work wonders in a more traditional or rustic setting.
- Creating a Cohesive Design: The hardware on your doors ties together various design elements within your home. Whether you choose to match the hardware to your other décor or make it a statement piece, it’s an essential part of ensuring the space feels cohesive. For example, matching your door handles with cabinet hardware, light fixtures, or faucets can create a streamlined and unified look throughout the space.
- Highlighting Architectural Features: In homes with architectural details such as paneling, arched doors, or intricate moldings, decorative hardware can accentuate these features. For instance, an ornate brass knob or an art deco handle can complement the rich detailing of a door, drawing attention to the craftsmanship and adding sophistication to the overall design.
- Ensuring Durability and Security: While primarily aesthetic, decorative door hardware also plays a functional role in your home. High-quality door hardware can improve the durability and security of your doors, ensuring they withstand daily use. Whether you choose a sturdy door handle or a decorative lockset, well-crafted hardware can make a significant difference in both form and function.
2. Types of Decorative Door Hardware
From handles to locks, door hardware comes in a wide variety of styles, materials, and finishes, allowing you to customize your doors to suit your design vision. Here are some popular types of decorative door hardware that can add charm and elegance to any door:
Subheading: Common Door Hardware Styles and Materials
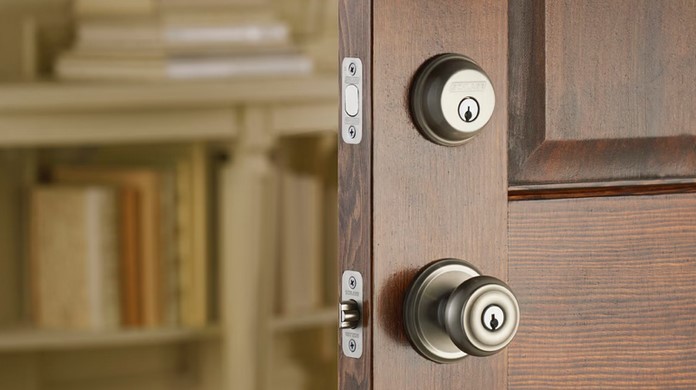
- Doorknobs and Handles: Doorknobs and handles are perhaps the most visible and important pieces of door hardware. They come in a range of styles, from simple, sleek knobs to more elaborate, vintage-inspired designs. Materials like brass, chrome, bronze, and even ceramic are commonly used for these pieces. For a modern home, a brushed nickel or matte black handle might provide a sophisticated, contemporary touch, while antique brass or glass knobs are often used for a more classic look.
- Door Knocker: For entry doors, a decorative door knocker can make a bold statement. Door knockers come in a variety of shapes and designs, including animal motifs, floral patterns, or simple geometric forms. A well-chosen door knocker not only serves a practical function but also acts as an instant attention-grabbing feature, setting the tone for the rest of your home’s interior.
- Locks and Deadbolts: In addition to their security function, locks and deadbolts can be decorative elements in their own right. Decorative locksets that feature intricate designs or matching finishes can complement the door’s overall aesthetic. For example, a vintage-style lockset might work well in a traditional or period home, while a sleek, modern lock could complement a contemporary space.
- Hinges: Although often overlooked, hinges play a crucial role in the functionality of a door. However, they can also add a decorative touch. Ornate or designer hinges, such as those made from wrought iron or with unique detailing, can enhance the look of a door and provide an unexpected element of style.
- Escutcheons and Backplates: Escutcheons and backplates are decorative pieces of hardware that surround a door handle or keyhole. These pieces are often used in vintage or antique-inspired doors to protect the surface around the lockset or knob while adding a refined finishing touch. Backplates with intricate designs can elevate the door’s appearance and make the hardware stand out.
- Push Plates: A push plate is another elegant option for certain doors, particularly on larger doors or doors that need frequent use. They not only protect the door from wear and tear but can also serve as a design element. Push plates are often used in commercial spaces but can also be found in high-end residential designs. They come in various materials, from brushed steel to ornate brass, offering a wide range of styles to match your décor.
3. How to Choose the Right Decorative Door Hardware for Your Home
When selecting decorative door hardware for a finishing touch, it’s important to consider several factors, including the design of your door, the overall style of your home, and your personal preferences. Here are some key considerations to keep in mind when choosing door hardware:
Subheading: Key Factors to Consider
- Style of the Room: The design of your space plays a large role in determining the best door hardware for your home. For example, if you have a modern or minimalist space, opt for sleek, simple hardware with clean lines, such as brushed metal handles or glass doorknobs. If your space has a more traditional or vintage feel, look for ornate handles or antique-inspired pieces that complement the decor.
- Material and Finish: The material and finish of your door hardware should match or complement the existing finishes in your home. For example, if you have a kitchen with stainless steel appliances, choosing stainless steel door handles will help tie the room together. Similarly, if your home features a lot of natural wood or rustic elements, matte black or bronze hardware may be more fitting.
- Durability: Although decorative hardware is meant to be visually appealing, it should also be durable and functional. Choose materials that will stand the test of time, such as solid brass, stainless steel, or bronze. These materials are not only durable but also resistant to corrosion and wear, ensuring that your hardware remains beautiful for years to come.
- Functionality: While aesthetics are important, don’t forget about functionality. Make sure the door hardware you choose suits the needs of the door it’s attached to. For instance, if the door is frequently used, opt for durable, easy-to-grip handles or knobs. For heavier doors, consider using sturdy hinges or robust locksets to ensure smooth operation.
In conclusion, decorative door hardware for a finishing touch is a powerful tool in creating a home that reflects your unique style. These small, often overlooked elements have the potential to transform your doors, adding both beauty and function. From doorknobs and handles to hinges and push plates, the right choice of door hardware can elevate the design of your home while providing the practical benefits of durability and security. By carefully selecting the perfect hardware for each room and ensuring it complements your overall décor, you can add the perfect finishing touch that enhances the character and charm of your space.