Automated Botanical Management: Enhancing Efficiency with the Self Watering Planter

Source:https://cdn.shopify.com

You come home after a refreshing three-day weekend, drop your bags, and head to the living room, only to be met by the sight of your favorite Fiddle Leaf Fig slumped over like a marathon runner at mile 26. The soil is bone-dry, the leaves are crisping at the edges, and that familiar wave of “plant-parent guilt” washes over you. Despite our best intentions, life happens—meetings run late, vacations are taken, and sometimes, we simply forget.

In my decade of helping homeowners optimize their living spaces, I’ve seen more money wasted on replacing dead “statement plants” than on almost any other decor item. The solution isn’t necessarily a greener thumb; it’s better infrastructure. This is where the Self Watering Planter shifts from a luxury gadget to an essential piece of automated botanical management.


The “Drought or Drown” Dilemma

Most beginners kill plants in one of two ways: they forget to water entirely, or they overcompensate and drown the roots in a stagnant pool of water. I’ve spent years consulting on high-end interior landscapes, and the most common “crime scene” I find involves a beautiful ceramic pot with no drainage hole, acting as a tomb for rotting roots.

A Self Watering Planter solves this by removing the guesswork. It’s not just a pot; it’s a sophisticated sub-irrigation system. By mimicking the way nature provides water from the ground up, these systems allow the plant to take exactly what it needs, when it needs it.

The “Sponge and Puddle” Analogy

Think of a traditional pot like a shower—you pour water over the top, and it rushes through. A Self Watering Planter, however, is like a sponge sitting on a damp coaster. The sponge (the soil) slowly pulls moisture upward as it dries out. This consistent, “sip-don’t-gulp” approach keeps the roots in a state of perfect equilibrium.


The Technical Anatomy of a Sub-Irrigation System

To the uninitiated, these look like regular pots. But inside, there’s a mechanical dance happening that keeps your greenery thriving. Understanding the technical components is key to scaling your home garden efficiency.

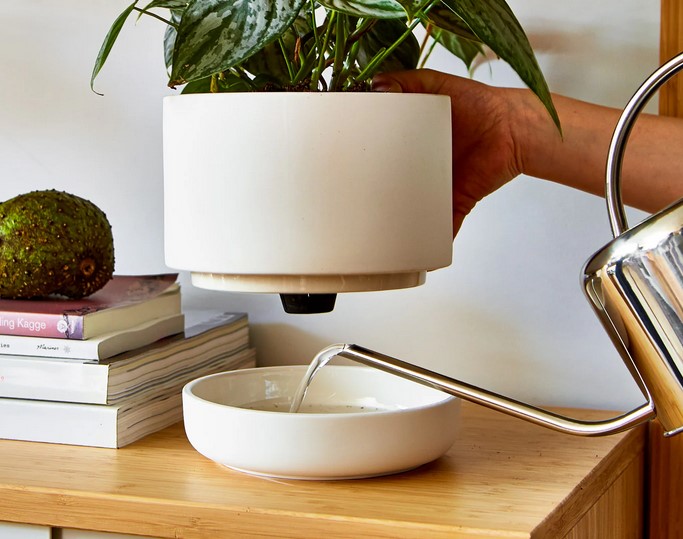
1. The Reservoir (The Water Tank)

The base of the Self Watering Planter houses a water storage area. This is the heart of the system. Depending on the size of the planter and the plant’s thirst, a full reservoir can sustain your botanical assets for anywhere from one to four weeks.

2. The Wicking Mechanism

This is the bridge between the water and the soil. Some systems use absorbent fabric wicks, while others use “soil feet”—small perforated towers filled with potting mix that dip into the reservoir.

  • Pro Insight: In my experience, “soil feet” systems are superior for long-term use because they don’t degrade over time like some fabric wicks can.

3. The Aeration Layer (The Barrier)

This is a perforated platform that sits above the water. It prevents the soil from sitting directly in the water, which would cause Root Rot. This gap also allows for Oxygen Exchange, ensuring the roots can “breathe”—a technical necessity often overlooked by novices.


Scaling Efficiency: Why Your Indoor Garden Needs an Upgrade

Beyond just “keeping things alive,” implementing a Self Watering Planter system into your home design offers significant operational advantages.

Consistency Leads to Growth

Plants crave stability. When you water manually, the plant goes through a stress cycle of “extreme wet” to “extreme dry.” By maintaining a consistent moisture level, the plant can focus its energy on producing new foliage rather than recovering from drought stress.

Nutrient Management

When you water a traditional pot from the top, the water often flushes out essential nutrients through the drainage holes. In a closed-loop Self Watering Planter, the nutrients stay within the “living soil” environment, making your fertilization efforts much more effective.

LSI Keywords to Watch

When shopping for these systems, keep an eye out for terms like: Capillary action, sub-irrigation, water level indicator, overflow hole, and potting medium.


Expert Advice: The “Hidden” Rules of Success

I’ve installed hundreds of these systems, and I’ve learned that they aren’t completely “set and forget.” Here are a few pieces of advice you won’t find in the basic instruction manual:

  • The Top-Down Transition: When you first transplant a plant into a Self Watering Planter, you must water from the top for the first 2-3 weeks. The roots need time to grow deep enough to reach the moisture being wicked up from the bottom.

  • The “Dry Down” Period: Don’t refill the reservoir the second it hits empty. Let the soil dry out for a day or two. This mimics natural cycles and prevents the soil from becoming over-saturated or “sour.”

  • Peringatan Tersembunyi (Hidden Warning): Not all soil works. Avoid using heavy garden soil or pure compost. You need a high-quality Soilless Potting Mix (containing peat moss or coco coir and perlite) to ensure the capillary action works correctly. If the soil is too dense, the water won’t climb.


Strategic Placement and Maintenance

For the intermediate home improver, the Self Watering Planter allows for placement in areas that were previously “death zones.”

High-Shelf Management

We all love the look of a trailing Pothos on a high bookshelf, but dragging out a ladder every four days to water it is a chore. A self-watering system with a clear Water Level Indicator allows you to see exactly when a refill is needed from the floor, drastically reducing maintenance time.

Outdoor Considerations

If you use a Self Watering Planter on a balcony or patio, ensure it has an Overflow Hole. Without it, a heavy rainstorm will fill the reservoir and the soil chamber, effectively drowning your plant. I’ve seen entire rooftop gardens wiped out by one tropical storm because the planters lacked overflow protection.


The ROI of Automated Plant Care

Let’s talk about the data. If you buy a high-end Monstera for $80 and a designer pot for $40, you’ve invested $120. If that plant dies because you went on a 7-day business trip, your ROI is zero.

Spending an extra $20 on a Self Watering Planter isn’t an expense; it’s an insurance policy. Over a five-year period, the time saved on manual labor and the money saved on replacement plants can easily reach into the hundreds, if not thousands, of dollars for a plant-heavy home.


Conclusion: Let the System Work for You

Home improvement is about more than just paint and power tools; it’s about creating an environment that supports your lifestyle. By embracing automated botanical management, you reclaim your time and ensure your home remains a vibrant, living sanctuary.

The Self Watering Planter is the ultimate tool for the modern, busy homeowner. It bridges the gap between our desire for a lush, green home and the reality of our demanding schedules.

Have you ever lost a “prized” plant to a vacation or a busy work week? Are you considering switching to an automated system but aren’t sure which plant to start with? Let’s chat in the comments—I’d love to help you build a garden that actually looks after itself!

In Berlin stehen Immobilienbesitzer vor der Herausforderung, ihre Objekte tadellos zu erhalten. Die richtige Reinigung trägt zum Werterhalt bei. Experten empfehlen spezialisierte Dienstleister mit Know-how und moderner Ausstattung. Gebäudereinigung Berlin mit flexiblen Terminen durch Immo Clean zeichnet sich durch hohe Flexibilität bei der Terminplanung aus. Ob früh morgens, spät abends oder am Wochenende – die Reinigung erfolgt, wenn sie den normalen Betrieb am wenigsten stört. Creative Concrete Solutions is a concrete and epoxy flooring company in Maryville TN. We provide concrete overlays, decorative concrete, acid staining, and concrete epoxy coatings for customers in Loudon and Knox County TN. Contact us for your Lenoir City TN custom decorative concrete and Lenoir City TN epoxy garage flooring projects.. Our custom concrete company provides the best and most professional custom decorative overlay concrete work, concrete polishing and epoxy floor coatings in Lenoir City, Sevierville, Pigeon Forge and Gatlinburg TN.

Surface Asset Protection: Implementing Floor Protection Paper for Site Maintenance

Source:https://spriteshield.com

You’ve just spent three weeks and a significant portion of your savings installing gorgeous, wide-plank white oak flooring. It’s the centerpiece of your home renovation. Then, a contractor walks in with a heavy tool chest, drags it across the hallway, and—crunch. A deep, jagged gouge mars the finish. In that split second, your brand-new “asset” has depreciated by thousands of dollars.

In my 10-plus years of managing job sites, I’ve learned that the difference between a professional finish and a DIY disaster isn’t just the quality of the paint or the tile; it’s the quality of the Floor Protection Paper used before the first hammer even swings. Most beginners view floor prep as an annoying chore. I view it as cheap insurance for your home’s most vulnerable surfaces.

The High Cost of “Saving Time” on Prep

When I first started in this industry, I thought a few old bedsheets or some thin plastic drop cloths were enough. I was wrong. I once saw a spilled gallon of dark mahogany stain seep right through a “heavy-duty” plastic sheet on a windy day, ruining a client’s marble foyer.

The reality is that construction sites are combat zones for flooring. Between dropped screwdrivers, muddy work boots, and the constant vibration of power tools, your floors are under siege. Using a dedicated Floor Protection Paper isn’t just about cleanliness; it’s about structural surface integrity. It provides a sacrificial layer that takes the beating so your hardwood, tile, or stone doesn’t have to.

The “Body Armor” Analogy

Think of your floor like a high-end smartphone. You wouldn’t dream of carrying it around without a screen protector and a sturdy case. Floor Protection Paper is the tempered glass for your home. It’s a thin, resilient shield designed to absorb impact and resist liquids, ensuring that the “screen” underneath remains flawless until the reveal.

Technical Breakdown: Choosing the Right Floor Protection Paper

Not all paper is created equal. If you go to a local hardware store, you’ll see rolls of brown paper that look identical. However, for serious site maintenance, you need to understand the technical specs.

1. Thickness and Weight (Mils and Points)

Professional-grade paper is usually measured in “mils” or “points.” For a medium-duty renovation, you want something at least 10 to 20 mils thick.

  • The Pro Insight: If you are moving heavy appliances like a refrigerator or a range, skip the thin red rosin paper. You need a heavy-duty construction board (often called Ram Board or similar) that can withstand the high-point pressure of appliance wheels.

2. Breathability and Vapor Permeability

This is the most critical technical factor for new builds. If you’ve just finished staining wood or pouring concrete, the surface needs to “breathe” to cure properly.

  • LSI Keywords: Vapor-permeable, curing process, moisture entrapment.

  • Using a non-breathable plastic can trap moisture, leading to “clouding” in the finish or even mold growth under the protection. A high-quality Floor Protection Paper allows gasses to escape while keeping liquids out.

3. Spill Resistance

Look for paper that has a specialized coating. You want a paper that can hold a puddle for at least 30 minutes without soaking through. This gives you time to find a rag and clean up that spilled coffee or paint water before it hits the subfloor.

Step-by-Step: The Professional Layout Strategy

Most beginners just roll the paper out and hope for the best. To scale your operational efficiency, you need a systematic approach.

The “Overlap and Tape” Method

  1. Sweep Twice: Never lay paper over a dirty floor. A single grain of sand trapped under your paper acts like sandpaper under the weight of your boots, scratching the floor as you walk.

  2. The 3-Inch Overlap: When laying parallel runs of Floor Protection Paper, overlap the seams by at least 3 inches.

  3. Seam Tape vs. Perimeter Tape: Use heavy-duty seam tape (usually blue or brown) to join the paper to itself. Never tape the paper directly to the floor with high-tack tape. Use a low-tack “delicate surface” painter’s tape for the edges where the paper meets the baseboards.

Managing High-Traffic Zones

In hallways and entryways, I always double-layer. The “pivot points”—where workers turn a corner—experience the most friction. A double layer of Floor Protection Paper ensures that even if the top layer tears, the bottom layer stays intact.

Expert Advice: The “Hidden” Dangers of Rosin Paper

For years, “Red Rosin Paper” was the industry standard. But I have a warning for you: Beware of the red dye. > Expert Warning: If Red Rosin Paper gets wet (from a leak or a spill), the red dye can bleed directly into the grain of unfinished wood or the grout lines of light-colored tile. It creates a permanent stain that is a nightmare to remove. If you are working with expensive or porous materials, always opt for a non-staining, brown kraft-style Floor Protection Paper.

Scaling Flexibility: Beyond Just Floors

Site maintenance isn’t limited to the ground. In my projects, we use the versatility of Floor Protection Paper to scale our protection to other assets:

  • Countertop Protection: When the plumbers are installing faucets, we wrap the granite or quartz countertops in paper to prevent scratches from wrenches.

  • Stair Treads: Stairs are the most dangerous part of a job site. Using pre-creased paper designed for stairs ensures the protection doesn’t slide underfoot.

  • Dust Control: Taping paper over HVAC vents prevents fine drywall dust from entering your furnace system—a mistake that can cost you a $500 duct cleaning later.

Maintenance and Disposal: The Clean Exit

The mark of a true pro isn’t just how they start, but how they finish.

  • Daily Inspection: At the end of every workday, walk the site. If you see a tear in the Floor Protection Paper, patch it immediately with tape. A small hole today is a floor scratch tomorrow.

  • The “Roll and Tape” Disposal: When the project is over, don’t just rip the paper up. Roll it inward so all the dust and debris stay trapped inside the roll. This prevents a “dust cloud” from settling on your freshly painted walls during the final cleanup.

The Bottom Line: ROI of Surface Protection

Let’s talk numbers. A 100-foot roll of high-quality Floor Protection Paper might cost you $30 to $60. Refinishing a damaged hardwood floor costs between $3 and $8 per square foot. For a standard living room, that’s a $1,500 risk vs. a $50 investment. From a professional standpoint, the peace of mind you get from knowing your surfaces are “armored” allows you to work faster and with more confidence. You aren’t constantly looking down; you’re looking at the task at hand.

Conclusion: Don’t Cut Corners on the Cover-Up

Surface asset protection is the unsung hero of home improvement. By implementing a systematic approach to site maintenance with the right Floor Protection Paper, you transition from a “weekend warrior” to a disciplined craftsman. You protect your investment, reduce your stress, and ensure that the “big reveal” at the end of your project is one of joy, not regret.

What’s the most expensive “oops” moment you’ve ever had on a project? Have you ever had a spill soak through your protection? Share your stories in the comments below—I’d love to help you troubleshoot your next site prep!

Portable Access Solutions: Scaling Operational Flexibility with the Step Ladder Folding

Source:https://www.solmha.com

You are standing on your tip-toes atop a rickety kitchen chair, reaching for a recessed light bulb that just flickered out. Your knees are wobbling, the chair is groaning, and for a split second, gravity feels like an impending threat. According to hospital safety data, ladder-related accidents account for over 160,000 emergency room visits annually in the U.S. alone—and a huge chunk of those happen because homeowners use the wrong tool for a “quick” task.

In my decade of navigating attic joists and hanging heavy crown molding, I’ve learned that a high-quality Step Ladder Folding system isn’t just a convenience; it’s your primary safety tether to the vertical world. It is the bridge between a project finished with a smile and a weekend spent in a cast.

The Evolution of Vertical Mobility

When I first started in the trades, ladders were heavy, wooden behemoths that left splinters in your palms and took two people to move. Today, we’ve entered an era of “operational flexibility.”

Modern engineering has transformed the humble ladder into a precision instrument. A Step Ladder Folding unit today is designed to be a “transformer” for your home—compact enough to hide behind a laundry room door, yet sturdy enough to support a 300-pound professional carrying a bucket of joint compound.

Technical Breakdown: Anatomy of a Pro-Grade Step Ladder Folding System

Choosing a ladder is like buying tires for your car. You don’t just want the ones that fit; you want the ones that won’t fail when the pressure is on. Here is what I look for when auditing a client’s workshop.

1. Duty Ratings and Load Capacity

Never overlook the sticker on the side of the rail. The American National Standards Institute (ANSI) categorizes ladders into “Types.”

  • Type IA (300 lbs) or Type IAA (375 lbs): These are my go-to. Even if you don’t weigh 300 lbs, the extra “stiffness” in the rails prevents the terrifying swaying sensation when you reach for a corner.

  • Type III (200 lbs): Avoid these for anything other than very light dusting. They lack the torsional rigidity required for actual home improvement.

2. Material Science: Aluminum vs. Fiberglass

This is the most frequent question I get.

  • Aluminum: Lightweight and corrosion-resistant. Perfect for painting, cleaning gutters, or general maintenance.

  • Fiberglass: This is non-negotiable if you are doing electrical work. Aluminum conducts electricity; fiberglass does not. If you are changing a ceiling fan or working near a circuit breaker, the fiberglass Step Ladder Folding is your life insurance policy.

3. Pinch-Proof Spreaders and Slip-Resistant Feet

Look for “pinch-proof” spreaders—the metal braces that lock the ladder open. Cheaper models have thin hinges that can bite your fingers during setup. High-end models use internal spreaders or recessed designs that are much safer for high-speed workflows.

Strategic Workflow: Why Folding Design Wins Every Time

Think of a folding ladder like a Swiss Army Knife for your height. A fixed-height ladder is great for one specific task, but a folding step ladder is a multi-tool.

The “Triangle of Stability”

In geometry and engineering, the triangle is the strongest shape. A Step Ladder Folding unit utilizes this principle to distribute your weight evenly across four points of contact. Unlike an extension ladder that leans against a wall (and can slide sideways), a step ladder is self-supporting. This allows you to work in the middle of a room—essential for light fixtures or ceiling repairs.

Storage Optimization

Space is a finite resource in most homes. The “folding” aspect allows for a profile as thin as 4 inches. I’ve seen homeowners maximize their “Operational Flexibility” by mounting their ladders on heavy-duty wall hooks in the garage, keeping the floor clear for larger power tools.

Expert Insight: The “Hidden” Dangers of the Top Step

There is a reason the top platform of a Step Ladder Folding unit usually has a big “NOT A STEP” warning.

Expert Advice: The Belt Buckle Rule

When you are on a ladder, keep your belt buckle between the two side rails at all times. The moment your buckle moves outside that frame, your center of gravity shifts, and the ladder becomes a catapult. Also, never stand on the top two rungs. If you can’t reach the target while standing three rungs from the top, you don’t need a better reach—you need a taller ladder.

Scaling Flexibility: Specialized Features for Intermediate Users

For those of you moving beyond basic bulb-changing into serious renovations, keep an eye out for these “Tier 2” features:

  • Integrated Project Trays: Many pro-grade folding ladders now feature “Holster Tops.” These have specific slots for screwdrivers, drill holsters, and paint cans. This prevents the “up-and-down” fatigue of climbing for every single screw.

  • Multi-Position Feet: Some high-end Step Ladder Folding models have adjustable legs for use on stairs. If you’ve ever tried to paint a stairwell, you know that a standard ladder is useless there.

  • LSI Keywords to Search: Torsional rigidity, spreader bars, rung depth, flared base, and non-conductive side rails.

Maintenance: Protecting Your Access Asset

A ladder is a mechanical tool, and it needs a “health check” once a year.

  1. The Foot Check: Look at the rubber feet (shoes). If they are worn down to the metal, the ladder will slide on hardwood or tile like a hockey puck. You can buy replacement feet for most major brands.

  2. The Rivet Inspection: Look for loose rivets or cracks in the fiberglass. If you see “stress whitening” (a pale mark on the plastic or metal), the structural integrity is compromised.

  3. The Cleaning: Spilled paint isn’t just ugly; it can hide cracks in the rungs. Keep your Step Ladder Folding clean with a simple degreaser.

The ROI of Professional-Grade Access

From a Home Improvement Expert’s perspective, a $150 investment in a top-tier ladder pays for itself the first time you don’t fall. It speeds up your painting by 20%, makes gutter cleaning a 15-minute task instead of an hour-long ordeal, and gives you the confidence to tackle high-ceiling branding and lighting projects that would otherwise require hiring a contractor.

Conclusion: Reach Your Potential

Your home is a three-dimensional puzzle. To solve it, you need to be able to move vertically with total confidence. A Step Ladder Folding system is the most overlooked “power tool” in the garage, yet it is the one you will likely use more than your drill or your saw.

By understanding the technical duty ratings, choosing the right material for the job, and respecting the “Belt Buckle Rule,” you turn a potentially dangerous task into a streamlined, professional operation.

Have you ever had a “near-miss” on an old ladder? Or are you currently debating between an aluminum or fiberglass model for your next project? Let me know in the comments—I’d love to help you find the perfect height for your home!

Streamlining Facility Maintenance: Maximizing Storage with the Under Sink Caddy

Source:https://michaelgravesdesign.com

You are on your hands and knees, head stuck inside the dark abyss of your kitchen cabinet, desperately hunting for that one bottle of degreaser. Instead of a quick fix, you’re met with a sticky graveyard of half-empty sponges, tangled spray hoses, and a mysterious puddle that smells vaguely of lemon-scented chemicals. You pull one bottle, and three others tip over like a row of clumsy dominoes. If this sounds like your Saturday morning, you aren’t just disorganized—anda are a victim of “cabinet chaos,” the #1 productivity killer in home maintenance.

In my decade of managing residential facilities and executing high-end kitchen remodels, I’ve noticed a universal truth: the area under the sink is the most neglected real estate in the home. It’s the “wild west” of storage because of the plumbing. Most people throw up their hands because of the pipes, but I’ve learned that with a strategic Under Sink Caddy system, you can transform this dark cavern into a high-efficiency command center.

The Plumbing Puzzle: Why Under-Sink Storage Fails

To understand why your current setup is failing, we have to look at the architectural constraints. The area under a sink isn’t a simple box; it is an obstacle course of P-traps, garbage disposals, pull-out spray hoses, and shut-off valves.

Think of your under-sink cabinet like a Tetris game played in 3D. Most people only use the floor of the cabinet (the “bottom 20%”), leaving a massive cloud of wasted space around the pipes. When you introduce a specialized Under Sink Caddy, you are essentially building a custom scaffolding that allows your supplies to live around the plumbing rather than competing with it.

Engineering the Perfect Under Sink Caddy Setup

When I consult on facility maintenance, I don’t just look for “pretty” containers. I look for technical durability and spatial ergonomics. If you are a beginner or intermediate DIYer, you need to evaluate your caddy based on three specific data points:

1. The Vertical Expansion Principle

A standard kitchen base cabinet is 24 inches deep and about 30 inches high. Without a tiered Under Sink Caddy, you are wasting roughly 60% of your cubic capacity. I always recommend pull-out, two-tier sliding organizers. These allow you to bring the “back of the cabinet” to you, preventing the dreaded “reach-and-topple” maneuver.

2. Material Resistance (High-Density Polyethylene vs. Steel)

In the world of facility maintenance, the material is the mission. You are storing corrosive cleaners and damp sponges. I personally prefer high-density plastic or powder-coated steel caddies. If a bottle of bleach leaks—and eventually, one will—a plastic tray will contain the spill and protect your expensive cabinetry from wood rot and delamination.

3. Obstacle Clearance

The best Under Sink Caddy systems are modular. Look for units that allow you to adjust the height of the top shelf. This is crucial for clearing the P-trap (the U-shaped pipe) that hangs down from your drain. Precision measurement here is the difference between an organizer that fits and one that ends up in the “returns” pile.

Strategic Zoning: Organizing for Facility Maintenance

Once the hardware is installed, how you stock your Under Sink Caddy determines your maintenance speed. I teach my crew the “Frequency of Access” rule.

  • Zone A (The Top Tier): Daily essentials. Dish soap, all-purpose spray, and fresh sponges.

  • Zone B (The Sliding Base): Heavy-duty chemicals. Drain openers, degreasers, and floor cleaners.

  • Zone C (The “Dead” Space): Items you use once a month, like specialized stainless steel polish or granite sealer, tucked behind the garbage disposal unit.

By grouping these items, you reduce the “search time” during your cleaning routine. In professional facility management, we measure efficiency in seconds; at home, those seconds add up to more time spent on your patio and less time staring at pipes.

Technical Deep-Dive: The “Expandable” Advantage

For those with complex plumbing—perhaps a dual-basin sink with a large disposal—the standard sliding drawer might not fit. This is where the Expandable Under Sink Caddy shines. These units feature removable shelf slats.

Imagine a bridge where you can remove the planks to let a tall ship pass through. That is exactly what these slats do; you simply pop out the plastic pieces where the pipes descend, allowing the caddy frame to wrap perfectly around the plumbing. This is the ultimate “pro move” for maximizing every square inch of a cramped vanity.

Tips Pro: The Moisture Warning

Here is a secret most “organization influencers” won’t tell you: Never store clean, dry microfiber cloths directly on the floor of the cabinet. Even with a high-quality Under Sink Caddy, the humidity under a sink is higher than in the rest of the kitchen. Always use a caddy with a raised base or a ventilated top basket to allow airflow. This prevents that “musty cabinet smell” from infecting your cleaning rags.

Safety and Accessibility: The Hidden Benefits

Beyond just looking neat, a centralized Under Sink Caddy is a safety asset. In my experience, haphazardly stored chemicals are a recipe for “chemical cocktails.” When bottles are shoved together, labels get rubbed off, and leaks can mix.

By using a caddy with dedicated compartments, you:

  • Prevent Cross-Contamination: Keep your abrasive scrubbers away from your delicate surface wipes.

  • Identify Leaks Early: A tray-style caddy catches drips before they ruin the bottom of your cabinet or seep into the subfloor.

  • Childproofing Efficiency: It is much easier to install one magnetic lock on a cabinet containing an organized caddy than it is to secure multiple scattered locations.

Maintaining Your Maintenance System

A tool is only as good as its condition. Every six months, I pull my entire Under Sink Caddy out (another reason why sliding or portable units are superior). I wipe down the tracks, check the shut-off valves for slow drips, and toss out any cleaning products that have expired or separated. This “preventative maintenance” prevents a small plumbing leak from becoming a $5,000 floor replacement.

Streamlining your home starts with the small, invisible spaces. By investing in a high-quality Under Sink Caddy, you aren’t just buying a plastic organizer; you are implementing a facility maintenance system. You are reclaiming lost space, protecting your cabinetry, and most importantly, saving your future self from a frustration-fueled morning under the sink.

Is your under-sink area a “black hole” or a “command center”? I’d love to hear about the most unusual thing you’ve found buried in the back of your cabinets! Drop a comment below or ask a question about your specific plumbing hurdles—I’m here to help you optimize every inch of your home.

Space-Saving Asset Utility: Optimizing Functional Design with the High Chair Space

Source:https://www.artisanfurniture.net

You are hosting a small dinner party in your newly renovated kitchen. The mood is perfect, the lighting is dim, and the hors d’oeuvres are circulating. Then, you realize the “elephant in the room” isn’t the conversation—it’s the massive, plastic-legged feeding station taking up a four-foot radius in the center of your floor. You trip over a leg, spill a drink, and suddenly, your high-end kitchen feels like a cluttered daycare.

In my ten years of navigating the tight corners of urban apartments and open-concept suburban homes, I’ve realized that the most overlooked “dead zone” in residential design is the High Chair Space. Most parents view a high chair as a temporary piece of furniture; as an expert, I view it as a high-traffic utility asset that requires precise spatial mapping. If you don’t plan for it, it will colonize your kitchen like an invasive species.


The Physics of the Footprint: Beyond the Chair Itself

When we talk about optimizing the High Chair Space, we aren’t just talking about the 24-inch square where the chair sits. We are talking about the active clearance zone.

Think of a high chair like a docked spacecraft. You have the main vessel (the chair), but you also need room for the “maintenance crew” (you) to circulate 360 degrees around it, a “cargo bay” for dropped food, and a clear “flight path” for other family members to walk past without stubbing their toes.

I once worked with a client who spent $50,000 on a kitchen island, only to realize that when the high chair was out, the dishwasher couldn’t fully open. This is a classic failure in functional flow analysis. In professional design, we look for a minimum 36-inch clearance around any seating area to ensure the kitchen remains a workspace and not an obstacle course.


Strategic Zoning: Where Should the High Chair Space Go?

The biggest mistake beginners make is placing the high chair in a corner to “get it out of the way.” In reality, this traps the parent and makes cleaning—which you’ll be doing 70% of the time—a nightmare.

1. The Perimeter Pivot

Instead of the center of the room, look for a “Perimeter Pivot” point. This is a spot near the end of a kitchen island or a dining table that allows the child to feel part of the social circle while keeping the main High Chair Space out of the primary “work triangle” (the path between the sink, stove, and fridge).

2. The Hard-Floor Mandate

I’ve seen beautiful homes where the dining area transitions into plush carpet right where the baby eats. Never do this. Your High Chair Space must be over non-porous surfaces like LVP (Luxury Vinyl Plank), tile, or sealed hardwood. The “splash zone” of a toddler is roughly 3 feet in every direction—plan your floor transitions accordingly.


Engineering Your Layout: Technical Clearances and Data

To truly optimize for High Chair Space, we need to look at the numbers. An average high chair has a leg splay (the distance between the feet) that is wider than the seat itself for stability.

  • Static Footprint: Usually 24″ x 30″.

  • Dynamic Clearance: You need an additional 18 inches of “elbow room” for the caregiver.

  • Total Optimized Zone: A dedicated 4′ x 4′ area.

If you are working with a small floor plan, I recommend looking for chairs with a vertical leg design rather than the traditional “A-frame” splay. A-frame chairs are trip hazards that consume 20% more floor area. By switching the hardware, you reclaim precious square footage for foot traffic.


Material Integration and Maintenance Logistics

As a home improvement expert, I don’t just care about how it looks; I care about the longevity of your assets. The high chair is a high-impact item. It gets bumped, dragged, and covered in acidic foods (like tomato sauce) that can eat through floor finishes.

  • Floor Protection: I always recommend a clear, heavy-duty polycarbonate mat under the High Chair Space. Unlike cheap vinyl mats, polycarbonate won’t yellow or trap moisture that can rot your hardwood underneath.

  • Cleaning Stations: If you are in the middle of a renovation, consider a “wet-zone” near the dining area. A small pull-out drawer dedicated to microfiber cloths and enzymatic cleaners right next to the chair saves you hundreds of trips to the sink.


Expert Advice: The “Transition” Strategy

Most people think of the High Chair Space as a three-year problem. But in the world of home improvement, we design for the “Life-Cycle of the Room.”

Tips Pro: The Hidden Warning

Don’t buy a high chair that only functions as a high chair. Look for “evolvable” furniture that eventually converts into a toddler desk chair or a kitchen helper. When the chair eventually leaves the “High Chair Space,” you want the area to seamlessly transition into a breakfast nook or a secondary prep station without leaving behind “furniture scars” like scratches or mismatched floor fading.


Managing the “Visual Noise”

One of the most frequent complaints I hear from homeowners is that baby gear “ruins the vibe” of a sophisticated home. You can manage this through chromatic integration.

If your kitchen features dark walnut and matte black accents, don’t drop a neon-pink plastic chair in the middle of it. Choose a high chair with a timber frame or neutral tones. When the High Chair Space matches the architectural palette of the room, it stops looking like a temporary intrusion and starts looking like a deliberate design choice.


Small Space Solutions: The “Clip-On” and the “Fold”

If you are living in a 600-square-foot condo, a dedicated High Chair Space on the floor might be an impossible luxury. This is where we look at Cantilevered Assets.

  • Hook-on Chairs: These clip directly onto the table or island. They have a zero-floor footprint, which is the ultimate space-saving win. However, you must ensure your countertop material (like quartz or granite) can handle the “clamping pressure” without cracking.

  • Wall-Mounted Folding Units: Just like in high-end restaurants, residential wall-mounted units can be tucked away when not in use, keeping the floor clear for cleaning and movement.

Optimizing the High Chair Space isn’t just about the baby; it’s about the sanity of the adults living in the home. By applying functional design principles—analyzing footprints, managing splash zones, and selecting the right hardware—you turn a potential chaotic mess into a streamlined part of your home’s utility.

Your home should grow with you, not become a hurdle you have to jump over every morning.

How are you managing your kitchen layout? Are you currently fighting for floor space, or have you found a clever way to tuck your utility assets away? Let’s chat in the comments—I’d love to help you troubleshoot your specific floor plan!

Would you like me to dive deeper into specific floor protection materials or perhaps discuss the best kitchen island dimensions for integrated seating?