
Source : https://theeverydayfarmhouse.com
Chalk It Up is a great way to add a unique and stylish touch to your home. With this project, you can create a chalkboard wall organizer that will help you stay organized and keep your home looking neat and tidy. This project is easy to do and requires minimal supplies. With a few simple steps, you can create a beautiful and functional wall organizer that will help you stay organized and make your home look great.
How to Create a Chalkboard Wall Organizer for Your Home: A Step-by-Step Guide
Creating a chalkboard wall organizer for your home is a great way to keep your space organized and stylish. This step-by-step guide will walk you through the process of creating a chalkboard wall organizer that will help you stay organized and make your home look great.
Step 1: Gather Your Materials. Before you begin, you will need to gather the necessary materials for your project. You will need a piece of chalkboard paint, a paint roller, painter’s tape, a level, a ruler, a pencil, and a piece of chalk.
Step 2: Prepare the Wall. Before you begin painting, you will need to prepare the wall. Start by cleaning the wall with a damp cloth to remove any dust or dirt. Then, use painter’s tape to mark off the area where you will be painting.
Step 3: Paint the Wall. Once the wall is prepared, you can begin painting. Start by pouring the chalkboard paint into a paint tray. Then, use a paint roller to apply the paint to the wall in even strokes. Make sure to cover the entire area that you marked off with painter’s tape. Allow the paint to dry completely before moving on to the next step.
Step 4: Measure and Mark the Wall. Once the paint is dry, you can begin measuring and marking the wall. Use a ruler and a level to measure and mark the wall in even lines. This will help you create a grid pattern for your chalkboard wall organizer.
Step 5: Draw the Grid. Once you have marked the wall, you can begin drawing the grid. Use a pencil to draw the lines of the grid. Make sure to draw the lines in straight, even lines.
Step 6: Write on the Chalkboard. Once the grid is drawn, you can begin writing on the chalkboard. Use a piece of chalk to write out the categories for your wall organizer. This could include things like “To-Do List”, “Grocery List”, or “Calendar”.
Step 7: Hang Your Wall Organizer. Once you have written out the categories for your wall organizer, you can begin hanging it up. Use a hammer and nails to hang the wall organizer in the desired location.
Creating a chalkboard wall organizer for your home is a great way to stay organized and make your home look great. By following this step-by-step guide, you can easily create a chalkboard wall organizer that will help you stay organized and make your home look great.
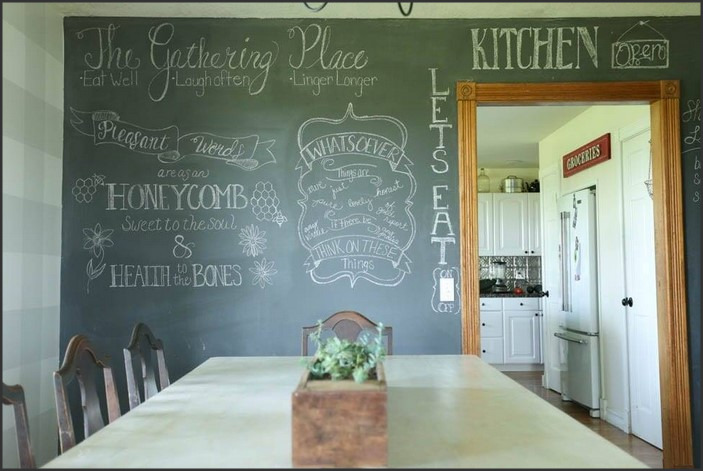
Get Creative with Chalk It Up: Ideas for Decorating Your Chalkboard Wall Organizer
Chalkboard walls are a great way to add a unique and creative touch to any room. With a few simple supplies, you can transform your wall into a functional and stylish organizer. Here are some ideas for decorating your chalkboard wall organizer:
1. Create a calendar. Use chalk to draw a calendar grid on your wall and fill in important dates and events. You can also use the calendar to keep track of tasks and deadlines.
2. Make a to-do list. Write down your daily tasks and goals on the chalkboard wall. This will help you stay organized and motivated.
3. Add a message board. Use the chalkboard wall to write down messages for family members or roommates. This is a great way to stay connected and keep everyone on the same page.
4. Create a grocery list. Write down items you need to buy at the store and check them off as you go. This will help you stay on budget and avoid impulse purchases.
5. Add a quote. Write down an inspirational quote or saying to keep you motivated and focused.
6. Make a timeline. Use the chalkboard wall to create a timeline of important events or milestones. This will help you stay on track and reach your goals.
7. Add a photo collage. Use the chalkboard wall to create a photo collage of your favorite memories. This will add a personal touch to your space.
8. Create a vision board. Write down your goals and dreams and use the chalkboard wall to create a vision board. This will help you stay focused and motivated.
By using these ideas, you can transform your chalkboard wall into a functional and stylish organizer. With a few simple supplies, you can create a unique and creative space that will help you stay organized and motivated.Chalk It Up: Creating a Chalkboard Wall Organizer for Your Home is a great way to add a unique and functional touch to any home. Not only is it a great way to keep your home organized, but it also adds a fun and creative element to any room. With a few simple supplies and a bit of creativity, you can create a beautiful and useful chalkboard wall organizer that will help you stay organized and make your home look great.