Source:https://www.oppoliahome.com
The kitchen is often considered the heart of the home. It’s a space for cooking, entertaining, and family bonding, making it one of the most frequently used and most important rooms in any house. As such, designing a kitchen that meets both your functional needs and aesthetic preferences is essential. Custom kitchen designs for a tailored look offer homeowners the opportunity to create a kitchen that perfectly fits their lifestyle, style, and space requirements. Rather than settling for mass-produced designs, custom kitchens allow you to make every detail—from the layout and cabinetry to the finishes and fixtures—your own. In this article, we will explore the benefits of custom kitchen designs, what to consider when designing your ideal kitchen, and the steps involved in creating a tailored space that reflects your personality and enhances your daily life.
1. Why Choose Custom Kitchen Designs?
A custom kitchen design is more than just a luxury; it’s a strategic investment that can transform your home. While standard kitchen designs may meet basic needs, custom kitchens offer a level of personalization that is unmatched. Whether you’re working with a small space or an expansive open-plan layout, custom designs can maximize both functionality and style. Here’s why opting for custom kitchen designs is worth considering:
Subheading: The Benefits of Custom Kitchen Designs
- Perfect Fit for Your Space: Custom kitchen designs are tailored to your exact space, ensuring that every square inch is used effectively. Whether you have an unusual floor plan or want to incorporate specific features like a large island or double ovens, a custom design allows you to optimize the layout for maximum efficiency. Custom cabinets can be designed to fit any nook, cranny, or alcove, making your kitchen truly unique.
- Enhanced Functionality: One of the biggest advantages of custom kitchen designs is the ability to create a kitchen that suits your specific needs. If you’re an avid cook, you might want extra counter space, specialized drawers for utensils, or easy access to your spices and herbs. If you entertain often, you may want a kitchen island that doubles as both a prep area and a seating area. Custom kitchens give you the flexibility to design for your lifestyle, ensuring that your kitchen works the way you do.
- Tailored Aesthetic: Custom kitchens are a blank canvas for your design vision. Whether you prefer a traditional, modern, farmhouse, or contemporary style, custom designs allow you to select materials, colors, and finishes that match your aesthetic preferences. From cabinetry and countertops to backsplashes and lighting fixtures, every element can be handpicked to create a cohesive and visually stunning space that reflects your taste.
- Increased Home Value: A well-designed custom kitchen can increase the overall value of your home. Potential buyers often look for kitchens that are not only functional but also aesthetically appealing. Custom kitchen designs can set your home apart in the competitive real estate market, offering a unique selling point when it’s time to move on.
- Quality Craftsmanship: With custom kitchen designs, you can ensure that the materials and craftsmanship meet the highest standards. Custom cabinets, countertops, and fixtures are often made with superior materials, providing long-lasting durability and a higher-quality finish compared to mass-produced alternatives. This means your kitchen will not only look better but also last longer.
2. Key Considerations When Designing a Custom Kitchen
Designing a custom kitchen is an exciting process, but it requires careful planning to ensure the final result is both functional and beautiful. From layout to material selection, there are several factors to consider to make sure your kitchen meets your expectations. Below are some key considerations to guide you through the design process:
Subheading: Crucial Factors to Keep in Mind
- Layout and Flow: The layout of your kitchen is one of the most important decisions in the design process. A well-designed layout ensures that the space is both functional and comfortable to use. Popular kitchen layouts include the U-shape, L-shape, galley, and open-plan kitchen with an island. Consider how you use your kitchen daily—whether you entertain, cook large meals, or have limited space—and choose a layout that enhances the flow of the room. The kitchen work triangle (the optimal distance between the sink, stove, and refrigerator) is also an important consideration for efficiency.
- Storage Solutions: Storage is a key aspect of any kitchen, and custom designs allow you to address specific storage needs. You can incorporate cabinets with pull-out shelves, deep drawers for pots and pans, or corner cabinets that maximize otherwise wasted space. Don’t forget about pantry storage, too—custom cabinetry allows you to design the ideal pantry to keep your kitchen organized and clutter-free.
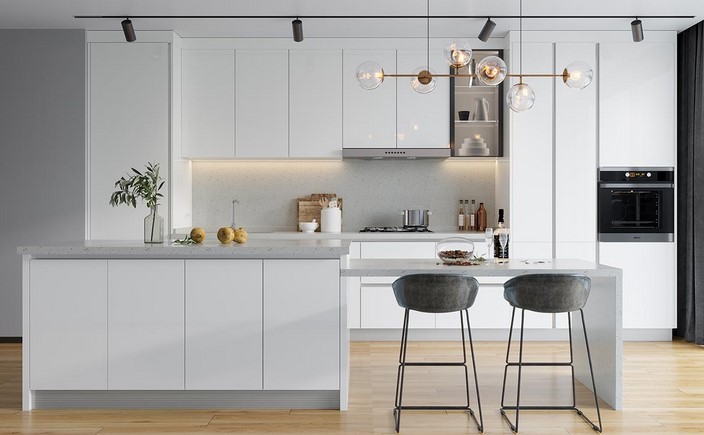
- Material Selection: One of the biggest perks of custom kitchen designs is the ability to choose high-quality materials. From the countertops to the flooring, the materials you select will significantly affect the overall look and durability of your kitchen. Common countertop materials include granite, quartz, marble, and wood, each offering its own aesthetic appeal and practical benefits. Similarly, cabinetry can be crafted from various woods, metals, or even glass for a more modern, open look. Select materials that suit both your style preferences and your functional needs.
- Lighting and Ventilation: Lighting is essential in a kitchen, and with custom designs, you can integrate both functional and ambient lighting to create the perfect atmosphere. Consider installing task lighting over work areas, under-cabinet lighting to brighten countertops, and accent lighting to highlight architectural features. Additionally, proper ventilation is crucial for eliminating cooking odors and maintaining a comfortable environment. Custom kitchen designs can incorporate range hoods, vents, and ceiling fans that are tailored to the space.
- Budget and Timeline: Custom kitchen designs tend to be more expensive than pre-fabricated options due to the materials, craftsmanship, and personalized design. It’s essential to establish a clear budget before starting the project and prioritize your must-have features. Keep in mind that custom designs may take longer to complete, so set realistic timelines and plan for potential delays.
3. The Process of Creating Custom Kitchen Designs
Creating a custom kitchen is a collaborative process that involves several steps, from conceptualization to installation. Working with an experienced designer or contractor can ensure that your vision is brought to life efficiently and effectively. Below is a general overview of the steps involved in creating custom kitchen designs:
Subheading: Steps in the Custom Kitchen Design Process
- Initial Consultation and Planning: The first step in designing your custom kitchen is to consult with a designer or contractor. This is when you discuss your vision, requirements, and preferences. The designer will assess your space, take measurements, and help you refine your ideas. They will also guide you in selecting materials, finishes, and colors that align with your overall design goals.
- Design and 3D Visualization: Once the planning stage is complete, the designer will create a detailed design plan. Many designers now use 3D modeling software to provide a visual representation of your kitchen before work begins. This allows you to get a clear idea of how the space will look and make any necessary adjustments before construction starts.
- Material Selection and Customization: With the design in place, the next step is to select the materials for cabinets, countertops, flooring, and other features. Custom kitchen designs allow you to handpick every element, from the wood for your cabinets to the backsplash tiles. This is also the time to finalize the hardware, such as knobs, handles, and faucets.
- Installation and Final Touches: After all materials are ordered, the installation process begins. This may take several weeks depending on the complexity of the design. Once the major components are in place, the final touches—such as lighting installation, hardware mounting, and decorative elements—are added to complete the kitchen.
In conclusion, custom kitchen designs for a tailored look are a fantastic way to create a personalized, functional, and aesthetically pleasing space that suits your specific needs and tastes. Whether you’re looking to maximize your kitchen’s storage capacity, create a space that reflects your unique style, or improve functionality, custom designs provide the flexibility to make your kitchen truly your own. By working closely with a professional designer and considering factors like layout, materials, and lighting, you can ensure that your custom kitchen meets both your practical requirements and your design vision.